
Chapter 14: Postmortem Examination
14.1: Postmortem Examination
Postmortem examination — most commonly known as autopsy, is a scientific and systemic study of a dead body.
Classification of Autopsy
Clinical/Pathological/Academic Autopsy
To determine the disease causing death.
A Pathologist performs it with consent of the relative of the deceased.
Medicolegal Autopsy: To solve mysterious unnatural death.
Anatomical Autopsy
To learn the normal structure of the human body by medical students.
It is usually done on an unclaimed dead body, handed over to anatomy department by municipal or such other governmental authority.
Consent for Autopsy
Clinical autopsy: Obtain consent from the relatives.
Medicolegal autopsy: No consent is required but legal permission or authorization (requisition from police) is a must.
Anatomical autopsy
Here permission must be obtained from government authority and the dead body is mostly unclaimed.
In a voluntarily donated dead body consent from the legal heirs is essential prior to the dissection.
Medicolegal Autopsy
A medicolegal autopsy is a special type of autopsy or postmortem examination, ordered by the government/legal authorities in all unnatural deaths, such as homicide, suicide, accident, etc.
Dearth of properly trained experts in the medical specialty.
Weather conditions in India set up the putrefactive changes early, rendering all the trace evidence lost in a dead body at times.
Scope and facilities for such investigation and examination are not satisfactory.
Medicolegal autopsy can be studied in detail under the following heads.
Objectives of Autopsy
Identity of the deceased: This is simple and easy if the person dead is well known. The problem is difficult when the dead body recovered is not known to anyone.
Time since death: Estimation of probable time since death is done by the various changes occurring in a dead body after death.
Cause of death: Establishing the case of death is an interpretive two-step intellectual process, deriving and depending upon sound evaluation of morphologic evidence of injury or of injury and disease, results of toxicological, biochemical, microbiological and histopathological studies.
First step involves recognizing structural organic changes (morbid anatomic features) or chemical abnormalities responsible for cessation of vital functions.
Second step in establishing cause of death requires an understanding and exposition of mechanism by which the anatomic and other deviations from normal actually caused death.
Live birth, period of viability, etc.
14.2: Authorization Order
Authorization order is usually in the form of requisition letter, which must be received by the doctor prior to autopsy, and it depends on the type of the case.
Identification of the Deceased
Known body: Confirm identity by the police officer or constable or the relatives or legel heirs. Always take the signature of the person identifying.
Unknown body: Ask police for taking the photograph, fingerprint, details on the particulars of the dress worn with the tailor’s label if any, etc.
Place of Performing Autopsy
Preferably done in an equipped mortuary
Autopsy is also done at site of recovery of the cadaver in cases of exhumation and putrefied body.
Medicolegal Autopsy Guidelines
Avoid unnecessary delay in performing autopsy.
Do not allow unauthorized persons into the mortuary. If allowed, record a statement from him or her giving reasons for his or her presence and signature for being present during the autopsy.
An autopsy is better done in the daylight (dawn to dusk).
Prepare the PM notes during autopsy or arrange to tape record the dictation.
Prepare the PM report immediately and sign it duly.
Handover this report and viscera only to an authorized police officer/constable maintaining the ‘Chain of custody’.
14.3: Autopsy Procedure
External Examination — it is the most important part of the medicolegal autopsy procedure, as most of the information gathered at this stage can always help a lot in solving the most mysterious deaths. This includes examination of:
Clothes
Stains of mud, blood, urine, stool, etc.
Identity
Body orifices
Finger/toenails
Injuries/surgical intervention
Rigor mortis
Postmortem staining
Decomposition/other changes.
Internal Examination: This includes dissection and examination of the three major body cavities and their contents, namely:
Skull/cranial cavity
Thoracic cavity
Abdominal cavity
Ludwig principal autopsy techniques
Technique of R. Virchow: Organs are removed one by one.
Here the cranial cavity is opened first, then spinal cord, followed by thoracic, cervical and abdominal organs in that order.
Technique of C. Rokitansky: This is characterized by ‘in situ’ dissection, in part, combined with removal of organ blocks.
Technique of A. Ghon: Thoracic and cervical organs, abdominal organs, and the urogenital systems are removed or organ block.
Technique of M. Letulle: Cervical, thoracic, abdominal and pelvic organs are removed as one organ mass and subsequently dissected into organ blocks.
14.4: Dissecting Cranial Cavity
Dissecting cranial cavity includes following steps
Scalp incision
Removing the skull cap
Opening the duramater
Removing the brain
Dissection of brain and its parts.
During each of the steps enumerated above, proper examination of each of the following is done
Scalp—any injuries
Skull—any fractures
Membranes—hemorrhages, pus, etc.
Brain—pressure manifestations, injuries, congenital anomalies, abscess, tumors, etc.
Scalp Incision
Incise the scalp in coronal plane, extending from one mastoid process to other.
Removing the Skull Cap
Incise the temporalis muscle and cut it along its origin and reflect down on both sides.
Next, saw the skull bone a little above superciliary ridges in front and occipital protuberance behind.
Now, let both lines meet at an angle of 120° above the mastoid process and then remove the skull cap, exposing dura mater.
Opening Dura Mater
Using a sharp pair of scissors make a nick on either side of midline anteriorly and extend it by cutting parallel to midline anteroposteriorly and then cut along the coronal plane on either side.
Removing the Brain
Insert four fingers of the left hand between the frontal lobes and skull.
Draw the lobes backwards gently and cut the optic nerve and then other nerves and vessels with the right hand as they emerge out from the skull.
Cut the tentorium cerebelli along the superior border of petrous bone and along its attachments in posterior cranial fossa.
Cut spinal cord, first cervical nerves and vertebral arteries as low as possible through foramen magnum.
Support the brain in the left hand and remove it with the cerebellum.
Dissection of Brain
The cerebral hemispheres are separated first by the left hand.
Using a brain knife, placing it in the longitudinal sulcus,
cerebral hemispheres of the brain are sectioned on either side, just above the level of corpus callosum, exposing basal ganglion, the lateral ventricles, the choroid plexus and inter- ventricular foramen, which are then examined.
Next cut the fornices and corpus callosum and reflect it backwards. Examine thalamus and caudate nucleus.
Third ventricle is now exposed; pass a probe through the aqueduct of Sylvius.
Expose the fourth ventricle now by cutting along vermis in midline by a scalpel.
The internal and external capsule and basal ganglia are now exposed and examined.
Remove cerebellum and brain stem now by cutting through cerebral peduncles.
Make sections through pons, medulla and remaining cord.
Expose the dentate nucleus by cutting cerebellar hemispheres.
14.5: Dissecting Thoracic and Abdominal Cavities
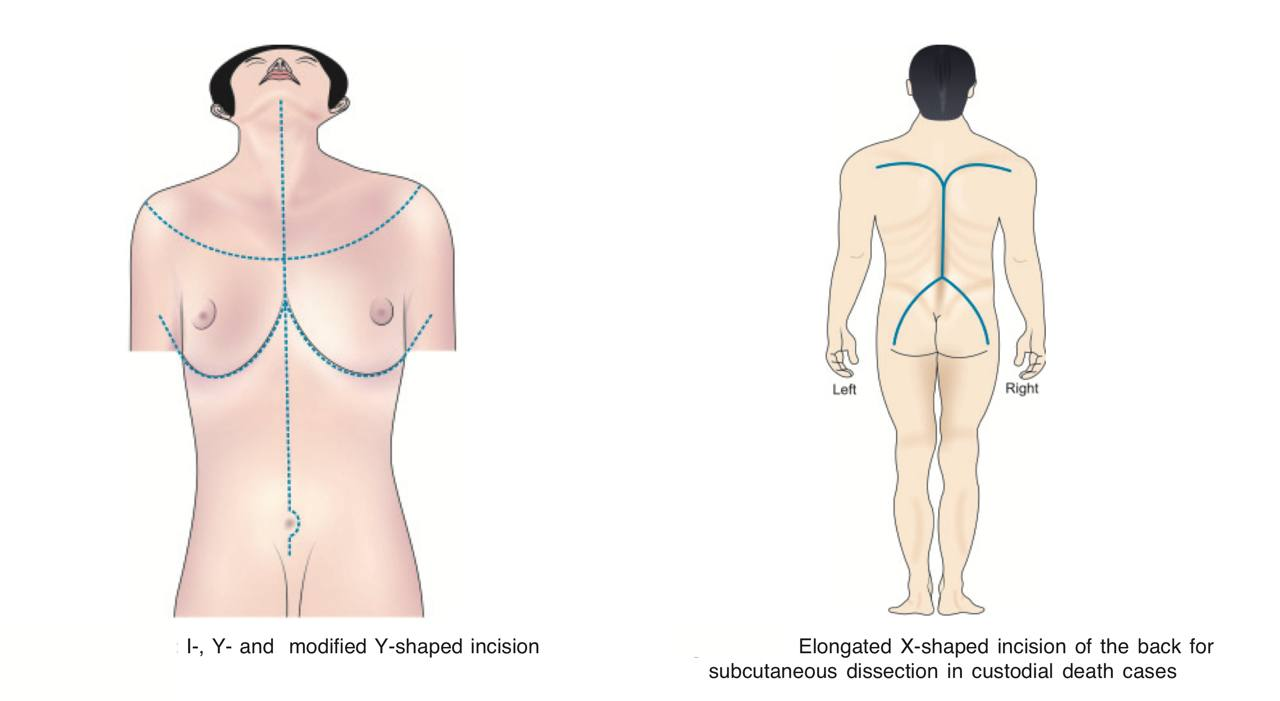
Incisions
I-Shaped Incision: Extends from symphysis menti to symphysis pubis taking curve towards left around umbilicus.
It is used routinely in practice.
It is simple and convenient.
Y-Shaped Incision: Commence at angle of mandible above on either side and the incision from both sides brought forwards, downwards to meet at the suprasternal notch and then run downwards as in “I” shape incision to symphysis pubis.
This is preferred when a detailed study of neck structures required.
It has a better exposure and allows study of neck structures.
Modified Y-Shaped Incision: Commences at anterior axillary fold on the chest on either side, runs downwards and anteriorly beneath the breasts as to meet at xiphisternum in the midline and then run downwards as in I-shaped incision to symphysis pubis.
Preferred in females.
It prevents cutting of the chest skin in midline and also allows detailed study of neck structures.
Elongated X-shaped Incision: This is special incision used to dissect out subcutaneous structures in the back to identify and evaluate the extent of blunt injuries, which are usually missed where superficial imprints are faint, particularly when present on skin not overlying bone.
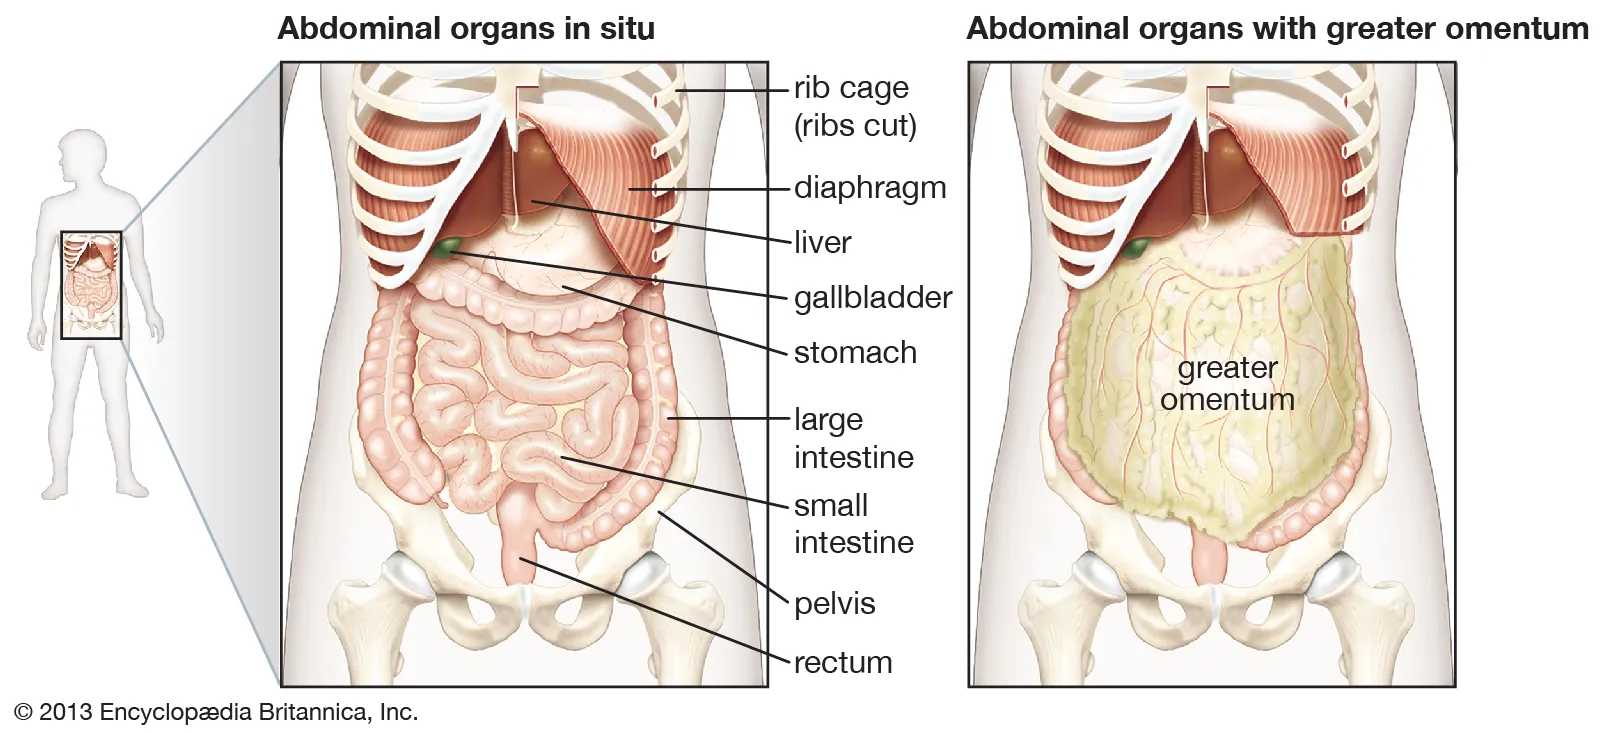
Removing the Abdominal and Thoracic Viscera
Opening Abdominal Cavity
The rectus abdominis muscle is incised first and then a small nick is made into the peritoneum.
Next, introduce the index and middle fingers of left hand into the peritoneal cavity.
Keeping adequate gap in-between the tip of the fingers pointing towards head-end or foot-end as needed.
Lift the abdominal wall and extend the cut upwards up to xiphisternum and then downwards up to symphysis pubis and open the abdominal cavity.
As the abdominal cavity is opened look for following:
Thickness of fat in abdominal wall, in the omentum and around kidneys
Presence of fluid, pus or blood in the peritoneal cavity
Evidence of perforation, obstruction, twisting, gangrene, etc. of gastrointestinal tract
Mobilize the large intestine by cutting along peritoneal attachments
Milk the contents of sigmoid colon and rectum proximally and cut it between two ligatures.
Opening the Thoracic Cavity
The skin, subcutaneous and soft tissues in the neck and chest are then reflected sideward.
Now, cut along the costochondral junction, and reflect the chest plate.
Introduce the hands into pleural cavities and explore and look for blood/fluid collection.
Disarticulate the sternoclavicular joints on either side, cut the cartilage of first rib and separate the chest plate and remove it.
Examine the mediastinum for injuries and other findings and notice accordingly.
Now, cut the tissue of the floor of the mouth along inner sides of lower jaw with tip of a long pointed knife and release the attachments of tongue.
Pull-down the tongue and cut behind the pharynx and larynx and release the attachments from vertebral column.
Cut the costocervical fascia and large blood vessels at the root of the neck.
Hold the tongue with a piece of cloth wound around it and trachea and by applying gentle traction, pull-down the thoracic organs caudally.
Cut the crux and attachments of diaphragm muscle and pull further caudally.
Pull-down further and remove all the organs en masse from the abdomen.
Keep the ‘en masse’ viscera thus removed on a dissection table in a prone position and cut open the aorta from below upwards starting at little above its bifurcation, up to the arch of aorta.
Esophagus is cut at the gastroesophageal junction between two ligatures.
Trachea is opened from above next, turning to either side at its bifurcation.
Each of the viscera is then removed and examined separately grossly and on sectioning, weight of each of the organs being measured before its dissection, except heart, which is weighed after the dissection.
The stomach is first removed by cutting between
ligatures at its cardiac and duodenal ends, and cut open along greater curvature studying the contents and changes of the wall. Smell the contents for any abnormal odor.
Heart is dissected in the direction of blood flow and is discussed separately.
Lungs, liver, spleen and kidneys are sectioned from its outer/ convex border to hilum.
While lungs and kidneys are sectioned into equal halves, liver and spleen are sliced into multiple sections allowing to visualize pathological/other changes due to disease/trauma.
Uterus with appendages must be removed ‘en block’ through abdominal incision, and dissected separately, noting the changes, especially the products of conception (fetus), presence of foreign body, tumor, or signs of delivery, criminal abortion, etc. prior to its sectioning.

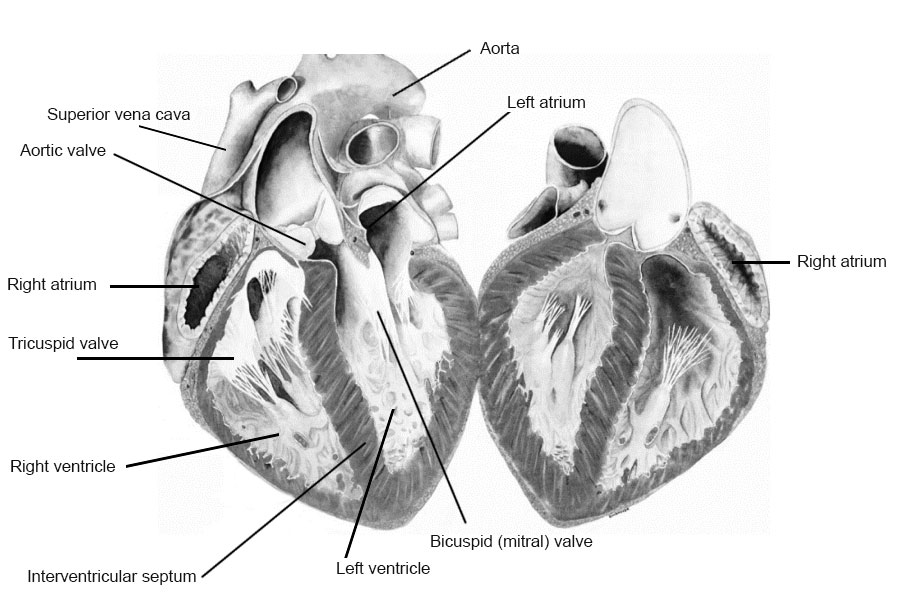
Dissection of Heart
To begin with, pass a forceps through the openings of superior and inferior vena cava and by cutting between the arms of forceps, open the right atrium. Open also the auricular appendage and look for the thrombi, if any.
Now, introduce two fingers into the right ventricle through the tricuspid valve and assess its size. Next, introduce a long pointed knife through it and pierce the apex and cut along the right lateral margin in one stroke.
Next, from the apex cut open the pulmonary artery, along its long axis and examine the valve, cusps and look for the presence of any embolus.
Then, pass the scissors into pulmonary veins, jointly cut them and enter into the left atrium. Cut the left auricular appendage and look for the thrombus, if any.
Introduce fingers into mitral valve and examine it (normally two fingers allowed). Now introduce the tip of a sharp pointed knife into mitral valve and pierce through the apex and cut along left lateral margin in one stroke
Examine the wall, valves, papillary muscles, chordae tendineae, septum, etc.
Next, open the aorta from the left ventricle and examine the aortic valve and coronary ostia. Pour a thin stream of water into these leaflets of the valves from a tap and confirm their intactness.
Coronaries are dissected longitudinally or by serial sectioning along their course for their patency.
Closing the Body
After complete dissection study, put all the viscera into the trunk and the body is closed properly suturing along the incisions using curved needle.
Clean the body and dress it properly in an appealing way, while being handed over to the police or deceased party.
Handing over the body to the police.
Always handover the body to a concerned police constable or officer who brought it for autopsy. Take a written statement for receiving the autopsied body by the police mentioning the actual date, time, etc. accurately.
Examination of Spinal Cord
A midline incision is given in the back along the entire length of neck and trunk, skin reflected out on either side laterally for about 2.5 cm.
The Vertical column is then chiseled out along the medial margin of the transverse processes of the vertebrae.
An electric saw may also be used in cutting.
Entire length of the spinal cord can be then taken out without causing much postmortem trauma.
Special Procedures for Specific Cases
Poisoning Case
Smell
Color of PM stain
Froth around mouth and nostrils
Corrosions
Any injuries, fang marks, etc.
Gastrointestinal tract findings
Hanging/Strangulation Cases
Ligature material and mark
Salivary dribbling marks
Face findings (eyes, pupils, and tongue)
Injuries to spinal vertebrae.
Bloodless dissection of neck
Firearms Injuries
Clothes
Cadaveric spasm
Radiological examination
Details of wound (terminal ballistics)
Projectiles, if any, must be collected, preserved properly with proper marking, etc. and dispatched to FSL.
Drowning
Changes in hand, feet, skin, etc.
Froth around mouth and nostrils
Cadaveric spasm
Injuries (reconstruction of case)
Air passages and lungs
Diatom test
Viscera for chemical examination (FSL)
Burns
Smell
Nature of burns (note antemortem postmortem, by looking for vital changes)
Age of burns or time since burns injury
Color of postmortem stains
Look for presence of soot particles in air passages suggestive of antemortem burns.
Criminal Abortion
Evidence of pregnancy and gestation period
Criminal abortion — evidence.
Toxic substance — evidence.
Sepsis, emboli, complications, etc.
Road Traffic Accidents
All injuries must be described.
Any foreign particles — preserved.
Alcohol — stomach, blood, urine.
Eyes — vision impairment evidence.
14.6: Negative and Obscure Autopsy
Negative autopsy — an autopsy, which fails to reveal the cause of death with gross, microscopic, toxicologic and other laboratory investigations.
Causes:
Inadequate history especially in cases of death due to vagal inhibition, hypersensitivity, etc.
Lapses in external examination as in case of death due to snake bite, other insect stinging, etc.
Inadequate or improper internal examination, e.g. air embolism or pneumothorax missed.
Insufficient laboratory examination.
Lack of toxicological analysis
Lack of proper training to perform an autopsy properly.
Obscure Autopsy
Obscure autopsy — an autopsy done meticulously, properly and perfectly, but may present with no clear-cut findings as to give a definite cause of death, leading to perplexity of the forensic pathologist.
Causes:
Natural causes such as:
Obscure morbid anatomy
Obscure histopathology
Emotional causes
Paroxysmal fibrillation, etc.
Biochemical disturbances like uremia, diabetes, etc.
Concealed trauma, such as concealed puncture wounds.
Endocrine disturbances such as conceded fractured wounds.
Poisoning due to:
Anesthetic overdose
Delayed narcotic poisoning
Miscellaneous—such as a putrefied body.
Medicolegal Importance of Negative or Obscure Autopsy
In autopsies, which are obscure, the medical examiner must not hesitate to state that no opinion can be given regarding the cause of death.
No doctor should entertain a guesswork in establishing cause of death for the reason that medicolegal autopsy is to exclude foul play and derive justice.
14.7: Fetal Autopsy
External Examination
Clothes and wrappings — if any may be noted for purposes of establishing the identity.
Postmortem changes — describe in detail.
Signs of maceration — the skin of the macerated fetus is coppery red in color. The body parts are flaccid and flat when placed on a table. The bones appear to be separated.
Umbilical cord — tied or torn, or with signs of inflammation.
Placenta — note whether attached or not, measure the weight, and look for any infarcts, disease, etc.
Signs of maturity — the various factors which are helpful in this context are as follows:
Crown heel/rump length with a flexible tape
Weight
Midpoint of body in relation to sternum and umbilicus.
Skin is wrinkled or smooth with presence of fat, covered with vernix caseosa.
Nails appeared or not. If present–extent of growth.
Scalp hairs appeared or not.
Eyelashes and eyebrows appeared or not.
Eyelids adherent or open.
Testicles ascertain the position by incising the scrotum and inguinal canal if necessary.
Ossification centers: Special emphasis may be given to note for ossification status of certain bones only in certain parts of the body by special procedures of dissection as described below:
Knee joint:
Open the joint by a transverse incision on the front.
Reflect the soft tissues upwards and bring out the lower end of the femur.
Make thin transverse slices with a cartilage knife starting from the periphery and look for the reddish ossification center.
Make further slices.
Make sure that the diaphyseal end is not mistaken for the epiphysis.
Section the upper end of the tibia similarly.
Ankle bones:
Make a longitudinal incision on the sole of the foot from the space between the third and fourth toes to the heel.
Reflect the lateral flap exposing the outer border of the foot.
Make slices in a sagittal plane to expose the centers of the calcaneus, talus and cuboid.
Sternum: Later the sternal plate is removed and making a midline incision, bisecting it may expose the centers.
Sacral segments: The sacral centers could be examined after other organs are examined.
Marks of violence on the body — look for the mouth, neck, head, etc. in and around for trauma or foreign bodies.
Cyanosis — look for this in the face, and fingernails.
Caput succedaneum — over the head (scalp) or buttocks.
Internal Examination
Examination of Skull and Brain
Reflect scalp as usual and cut through the membranous connections of the skull bones.
Look for bruising of the scalp, fracture of skull bones, site and extent of caput, molding, tears in membranes, hemorrhage in meninges, puncture in anterior fontanel, etc.
Remove and examine the brain.
Examination of Thorax and Abdomen
Make a midline incision from chin to pubis avoiding umbilicus.
Open the abdomen first and ascertain the level of the diaphragm.
Then reflect the chest muscles, remove the sternal plate exposing the viscera. Note the position of the heart and lungs in situ.
The floor of the mouth, larynx and deeper tissues of the neck are now examined—for foreign bodies, mucus, meconium and marks of violence.
Ligate the trachea halfway to its bifurcation to prevent foreign bodies from entering.
Apply a similar ligature to the esophagus to prevent entry or escape of air.
Remove the thoracic organs en masse by gentle traction.
Put the whole piece consisting of the heart, thymus and both the lungs in a tall jar containing water and note whether it sinks or floats.
Look for the presence of Tardieu’s spots under the serous membranes.
Open the trachea and bronchi and note down the contents.
Remove the lungs and heart.
Make a transverse section of the heart through the ventricles and note any difference in color of blood on two sides.
Examine the lungs for its weight, color, consistency, edges, presence of distended air cells under pleura, crepitation and for conditions like collapse or consolidation.
Make further observation when the organ is sectioned.
Perform hydrostatic test at this stage.
14.8: Hydrostatic Test
Hydrostatic test is a test done to confirm whether the lungs tested are from a respired newborn or not.
If the newborn has respired after birth, the air that has entered the lungs shall remain within the lungs as residual air, which cannot be removed even after death, renders the lung lighter and makes it float in water giving positive result.
Procedure
Put each lung separately into a jar of water, see whether it sinks or floats.
Cut each into 10 to 12 pieces and observe the blood exuding. Test each of them for buoyancy.
Pick up the floating pieces, and press firmly under water. Observe the nature of bubbles streaming up. Note whether they continue to float or not.
Interpretation
If the entire lung floats, it means that the child had not only respired but respiration had been completely established. In the absence of putrefaction this test itself is conclusive.
If some pieces float but others sink, the child has of course respired but for a very short period and ineffectively. Yet it is a live born child.
If all pieces sink, the child never respires and is stillborn.
Fallacies
Putrefaction: An unrespired lung may float due to gasses of decomposition.
Edema lungs, congenital syphilis, pneumonia, lung collapse, etc.: These conditions can make a respired lung sink in water.
14.9: Stomach Bowel Test
Breslau’s Second Life Test — done to determine whether the child was born alive or not.
Some air is swallowed during respiration in a live born child and detecting the presence of this air in these viscera constitutes the basis for this test.
Procedure
Remove stomach and duodenum separately by cutting in ligatures.
Place them both in water. See whether they float or sink.
If they float, make a small cut while under water to see air bubbles coming up.
Inference
A floating viscera giving out air-bubbles when opened under water is positive test and suggestive of live birth.
A positive test proves live birth even in the absence of a positive hydrostatic lung test. This may happen, if there had been some obstruction in the respiratory passages.
A negative test does not mean stillbirth since air does not necessarily enter the stomach in adequate amounts during the breathing act.
Putrefaction invalidates the result.
Other Findings Suggestive of Live Birth
Open the stomach along the greater curvature and look for mucus and milk, which is suggestive of not only live birth, but also indicates that the infant had lived for some time.
Examine the large bowel for meconium and urinary bladder for urine, presence of which indicates that the child had lived for some time.
The umbilical vessels are removed and examined histologically, which is of help in determining exactly how long the child lived.
The ossification centers certain parts of the fetal body are dissected and exposed last to confirm the presence or absence of ossification centers in order to determine the age (see above for details).
14.10: Age of Fetus
Infanticide: A child which has completed 7 months of IU development is deemed viable, i.e. capable of being born alive and reared.
The possibility of live birth is ruled out if it is below the age of viability and a charge of infanticide cannot be sustained.
Criminal abortion: To know whether the mother was quick with the child. At about 14-18 weeks of pregnancy she feels the fetal movements from within.
Abortion induced after this period brings enhanced punishment.
14.11: Whether the Child was Born Alive or Not
Live Born Child — partly or wholly born external to the mother and showed some signs of life. It is found out by the presence of certain well-defined changes that occur in the body after birth and known as “signs of live birth.”
Dead born child — died in the uterus long before labor started. It is diagnosed by the presence of maceration.
Stillborn Child: After being born the child never showed any sign of life. It might have died during delivery. It shows neither the signs of maceration nor positive signs of live birth. A complete autopsy may give the cause of stillbirth.
To ascertain whether the child is born alive or not, the following should receive consideration:
Signs of maceration: If signs of maceration are present, live birth can be ruled out.
Signs of immaturity: Estimate the age of the fetus by observing the length, weight, midpoint of the body, skin, nails, scalp hair, eyelashes, eyebrows, eyelids, testicles and ossification centers. If the child has not attained a viable age, it could not have been born alive.
Signs of respiration: There are several gross and microscopic findings, which can suggest whether a newborn has respired, or not.
Confirmatory signs of live birth:
Milk in the stomach
Absence of meconium in the large bowel, the exception being breech delivery.
Exfoliation of the skin
Closure of fetal channels
Changes in the umbilical cord.
14.12: Firearms Injuries
Range of firing beyond arms length cannot be suicidal, unless otherwise certain special mechanical devices are used.
Absence of weapon at the scene of death excludes suicide.
People who commit suicidde use “sites of election” to kill themselves with guns.
People who commit homicide usually choose sites like inaccessible parts of the body (for a victim).
Regarding wounds inflicted on eyes, back of the head, abdomen, etc. accident or murder is highly likely.
Back of the head or nape of the neck is a traditional “execution site” in terrorism or assassination.
Women rarely shoot themselves, or others.
Accidental firing by women is also unlikely for the reason that they rarely have interest in firearms as men have.
14.13: Knife Wounds
Presence of tentative cuts or hesitation cuts
This usually seen on the wrist, throat, etc.
In right-handed victims, the cuts in the throat are often deepest on the left side while it tails off to the right, passing obliquely downwards across the larynx, which may be badly damaged.
Homicidal cutthroat is usually more severe and lacks tentative cuts.
Homicidal cut wounds are usually deep even into the vertebral column.
In self-destruction, the stabs are most often into chest, though some may be made into the head through skull. Abdominal wounds are uncommon, as are gunshots, as it is well known that death may be uncertain or lingering and painful.
Suicidal chest wounds are usually over left side, where the heart is generally known to be situated. Stabs are usually single, but multiple stab wounds by no means indicate homicide, even if each wound is potentially fatal.
Homicidal stab wounds have no particular characteristics and can only be identified if they are into inaccessible parts of the body such as the back or if the weapon is present at the scene of death.
Fatal accidental stab wounds with knives is unusual, but may occur in butchers, slaughtermen, etc.
Fatal stab wounds from falling through windows and glass doors, etc. are also well recorded, but the circumstances are usually obvious.
14.14: Hanging, Strangulation and Suffocation
Hanging is almost always suicidal and although more common among men, is not unusual in women.
Homicidal hanging is very rare and unless the victim is drugged or drunk, hanging cannot be accomplished in resisting conscious person, unless restrained by tying up, etc.
Self-strangulation is virtually impossible with the hands.
In ligature strangulation, whether murder or suicide, the mark on the neck takes generally a horizontal course, even though this might be high up under the chin and angles of the jaw.
In hanging, there is usually a rising ligature mark to the place where the knot is situated, generally leaving a gap missing gap in the skin where the rope leaves the body surface to ascend to the knot.
Suffocation, by external soft fabrics, pillows, cushions and plastic sheets almost never leaves any signs and, cannot be differentiated from other natural deaths if the obstructing object is removed before the doctor or other witness attends the scene.
Sufficient pressure exerted may cause abrasion; contusion, etc. which may create suspicions. At the same time care must be taken not to mistake postmortem blanching around the mouth and nose as signs of deliberate suffocation.
14.15: Drowning
Removal of clothing, spectacles, etc. and kept on the river banks are suggestive of suicide than accident or homicide.
The facts that tying of hands and legs/tying some heavy objects like stone, bricks, etc. by a determined the person who commit suicide need to be convinced that the tying is by the victim himself or herself, as otherwise it might be done by a criminal who might have tied his or her victim prior to pushing them into the water.
14.16: Selected Special Procedure of Autopsy
Demonstration of air embolism
Presence of air in the vascular system is demonstrated by easy and accurate methods.
Interrupted blood column, i.e. fragmentation of the blood line in the coronary arteries, meningeal arteries or arteries elsewhere are usually artifactual and must not be mistaken for air embolism.
Usual indications for air embolism are:
Suspected criminal abortion
Open wound of the neck
Demonstration of pneumothorax
Pure form of pneumothorax is rare.
It is usually associated with injury to the lung, resulting in blood in the pleural cavity or hemopneumothorax.
Every case of chest injury is an indication for checking for the presence of air or pneumothorax.
Demonstration of thrombi in the calves
Formation of thrombi in the calves is a common complication of prolonged bed rest or may be due to direct trauma to the legs.
Dislodging of a leg vein thrombus may cause fatal pulmonary embolism.
Reconstruction of the skull for personal identification and determination of type of violence
Restoration of the contour of the skull frequently provides the answer to these questions.
Using an electric drill and copper wire or quick fix gum one may carry out replacement and fixation of the bone fragments.
Removal of the jaw for dental identification
Disarticulation of the mandible and excision of the upper jaw may be necessary under such circumstances to ensure adequate examination and possible preservation as evidence.
Using an electrical or manual saw, the upper jaw is excised by means of horizontal cut placed above the hard palate.
Examination of the Cervical Spine for Whiplash Injury
The whiplash injury range from severe fracture dislocations to a few deep hemorrhages due to tear of individual muscle fibers in the musculature.
Tears of articular capsules and ligaments with intra- articular or periarticular hemorrhage are common in the first two vertebrae.
Removal of spinal cord by anterior approach
The method required no special requirements.
A Stryker saw, a sturdy knife, a chisel and a hammer are the only requirements.
This spinal cord can be removed intact and is good for both gross and histopathological examinations.
This method also avoids incision of the back.
Fixation of the brain
The brain is usually suspended in a bucket of chilled formalin, using a string through the circle of Willis.
The bucket with the brain is better preserved in the body refrigerator.
Adding a little of kitchen salt can help float the brain in solution.
Drying of the area of the brain, which floats above the level of solution, can be prevented by keeping it wet by covering the area with a paper/ towel, soaked in the solution.
The shrinkage of tissue by salt dissolved in formalin is minimal and not detectable microscopically.
Autopsy photography
Shoot always the photographs of the cadaver/part of the body at right angles from above, to reduce the perspective distortions.
Do not make photographs too gory.
Cotton plugs in the nostrils, ears, hospital bandages and wrappings should be removed from the body and the part must be wiped clean and removing the dry blood adherent to the surface showing all particulars.
The PM case number, date of autopsy and a suitable size scale should be included in every case photographed.
In violent death cases, front and back views of the entire body with clothes and in the nude are recommended.
It is important to show the condition of the body when first viewed.
Identification of the victim is often made easy by a photograph of the face.
Repair of the facial injuries and application of make-up by a well-qualified mortician are often helpful in such cases.
Tattoos mostly help in the identification of the unknown.
Palmar surface of the victim’s hand is often necessary to be photographed to show electrical burns, defense cuts, bullet wounds or discoloration of the skin due to handling of certain drugs, etc.
14.17: Second Autopsy
Second Autopsy: A repeated medicolegal postmortem is performed with the authorization by law, usually occurs after the first autopsy.
The second autopsy is ordered/performed in extraordinary circumstances such as:
The relatives are not satisfied with the first autopsy report and they have pointed out certain lapses in the first autopsy.
The first autopsy was not performed in the light of the circumstances which are now available.
The investigating authority wants the second autopsy to set the investigation on the right track.
The second autopsy is beneficial as it clears all the suspicions of the relatives and also the discrepancies of the first autopsy and helps in the administration of justice.
14.18: Examination of Bones
When skeleton or isolated bones are sent for opinion, the usual questions that a police-officer poses to a medical officer are:
Whether the bones are human or not?
If human, whether they are male or female?
Whether they belong to one or more individuals?
The statues of the individual to whom the bones belonged.
The age of the individual to whom the bones belonged.
The time of death.
Where the bones have been cut, sawn, gnawed by animals or burnt?
The probable cause of death.
14.19: Examination of Mutilated Bodies or Fragments
All separate parts should be kept together, and determined whether they belong to one and the same body.
Bones from different skeletons can be distinguished by exposing them to a short wave ultraviolet lamp, which shows different color emissions from different skeletons.
The nature and character of the parts should be described, as also the color of the skin, if any.
The manner of separation, as to whether they had been hacked, sawn through, cut cleanly, lacerated, or gnawed through by animals.
If the head or trunk are available, the sex can be determined from the presence and distribution or absence of hair, general conformation and shape of pelvis, sacrum or femur.
The probable age may be ascertained from the skull, teeth, color of the hair, trunk, size and degree of development of fragments and ossification of the bones.
Identification can be determined from tattoo marks, fingerprints, scars, color of hair, condition of teeth, deformities, recent and old fractures, or from the discovery or certain articles of clothing known to have belonged to a missing person in association with the mutilated bodies or fragments of a skeleton.
Height can be calculated from the measurements of long bones.
The probable time since death may be ascertained from the condition of the parts.
The cause of death can be ascertained, if there is evidence of a fatal injury to some large blood vessel or some vital organ.
Identity can be established by superimposing a life size photograph of the head of a person of the skull, and reconstructing the features.
14.20: Examination of Decomposed Bodies
On a decomposed cadaver, a pair of steel hooks with bent, adequately long handles are very convenient for hooking up the abdominal and other incisions so as to keep the parts open and also for opening the pericardium and hooking up the heart, lungs and other organs.
In a highly decomposed body, even after 5-6 days of death with skin peeled off epidermis, in violent asphyxial cases of strangulation and hanging, the ligature mark would be apparent.
In advanced putrefaction, the presence of mud in the bronchus is diagnostic of death due to drowning.
Valuable clues to the cause of death may be derived by presence of foreign bodies, such as a bullet, a piece of a weapon or some other objects in a decomposed body.
In fracture skull bones, presence of clotted blood may be found on their inner plates, or on the surface of the dura mater and on the brain, would not be enough to give an opinion that the fracture was caused before death.
In all doubtful cases, it is better to give a guarded opinion that the injuries found on the body, if inflicted during life, were sufficient enough to cause death.
In cases where the cause of death cannot be found owing to advanced decomposition, necessary viscera should always be preserved for chemical analysis.
14.21: Postmortem Destruction by Predators
Predation varies greatly with geography, season and whether the dead body is indoor or outdoor. Lying open in the countryside, large predators can cause severe damage.
If the dead body is in water (river/sea water) then damage by normal inhabitants of water is usual.
Damage by the canines and rodents is obvious as the impressions of typical teeth-marks are usually observed at the sites of localized loss of flesh.
Maggots, the larval stage of common house and blowflies are the most efficient tissue removers.
They secrete proteolytic enzymes which help in softening the tissues and making their way deep into the interior of the body.
This also helps in easy access to the external microorganisms.
Ants and insects mostly attack the exposed parts and the moist areas of the body, such as around the eyelids, lips, axilla, groin and on the knuckles
Cockroaches are common in the residential setting. They are omnivorous scavengers having predilection for devouring keratin.
In water, all kinds of aquatic animals may be involved and if the corpse is lying in shallow water or on the bank of a pond or on a sea beach, land animals also attack the body.
14.22: Artifacts
Artifacts — any change or alteration, which is man-made as a whole or introduced in the natural state of the body is likely to be misinterpreted at autopsy.
Therapeutic Artifacts
Vigorous external cardiac massage may result in fractures of the ribs and sternum.
Automated pneumatic cuffs used for blood pressure monitoring placed around the upper arm can cause petechial ecchymoses, compartment syndrome from an intramuscular hematoma.
Injection marks against the cardiac region and ring-like bruising caused by a defibrillator, may be the other sources of confusion.
Administration of fluids or multiple blood transfusions may introduce changes in the blood alcohol concentration or concentrations of other toxic agents.
Shape and size of the injury/injuries may be altered by the surgical intervention.
Changes intervene in the injuries with the passage of time in the form of healing or becoming septic, etc.
Agonal Artifacts
Absence of appreciable hemorrhage does not necessarily indicate its postmortem origin nor does the presence of extravasated blood into the tissues always suggests its antemortem origin.
An individual may collapse and die along the roadside and may subsequently be run over by some vehicle, leading on to collection of blood in the body cavities and some into the tissues too.
Agonal spillage of the gastric contents into the respiratory passage has been discussed under, ‘Sudden and Unexpected Deaths’.
Postmortem Artifacts
Postmortem artifacts imply any alteration, modification, addition or subtraction of some postmortem features due to certain factors originating after death.
Artifacts induced by transportation/storage/handlings, etc.
Artifacts induced by embalming, decomposition, etc.
Artifacts induced by predators or deliberate mutilation/ dismemberment by the criminals.
Artifacts induced by improper autopsy procedures.
Artifacts Induced by Transportation/ Storage/Handling, etc.
Postmortem lividity is usually purplish in appearance.
Postmortem collection of blood in the occipital region is due to bumping of head.
Protruding areas of the body may get abraded due to dragging of the body.
Rigor mortis may be broken during lifting or handling of the bodies giving wrong clues towards time since death.
Rarely, fractures of the long bones may be caused particularly in debilitated, elderly dead bodies with osteoporotic changes.
During transportation, the dead body may be contaminated with dirt, soil, grease, etc.
This may give the wrong impression about the place of occurrence of death.
Tearing of the clothing during transportation may appear to be due to some scuffle during life.
Attempts to remove ornaments from the body parts like nose, ears, neck, etc. may cause injury to these parts and may send wrong impressions.
Artifacts Induced by Embalming, Decomposition, etc.
The embalming technician may pass trocar in any of the wounds already present upon the body or may make a fresh cut. Embalming fluid used may pose problems in chemical analysis of viscera.
Decomposition of the body may lead to production of most common artifacts:
Bloating, discoloration and blistering of a body may be mistaken for disease or injury.
Distension of parts of the body having loose tissues like tips, eyelids, breasts, penile and scrotal regions and protrusions of tongue, may impart false sense of obesity.
Expulsion of blood-tinged fluid from the mouth and nose may be mistaken as bleeding originating during life.
If the deceased were wearing tight clothing or having a neck tie, a groove may appear around the neck and this along with bulging of the eyes and protrusion of the tongue may be mistaken for strangulation.
Fissures or splits formed in the skin during decomposition may simulate incisions or lacerations.
Expulsion of semen or vaginal discharge due to pressure of putrefying gases may wrongly suggest involvement of sexual activities with the cause of death.
Marked bluish discoloration of the loops of intestines especially in the pelvic cavity may not be mistaken for infracted bowel.
Autolytic rupture of stomach can occur postmortem with release of the stomach contents into the peritoneal cavity.
The pancreas too, may undergo autolysis due to proteolytic enzymes within it.
Separation of skull sutures or bursting of abdomen with advanced putrefaction may be mistaken for trauma.
Putrefactive gas in the right side of the heart may be mistaken for air embolism.
Small round holes due to maggots may be mistaken for bullet/pellet holes.
Artifacts Induced by Predators or Deliberate Mutilation / Dismemberment by the Criminals
Common terrestrial creatures attacking the dead body in and around the mortuary are rats, rodents, ants, cockroaches and crows, etc.
Ants, insects mostly attack the exposed parts and moist areas such as face, arms, genitals, groins and axilla, etc.
Rats, cats and dogs usually destroy the soft tissues of the exposed parts.
Bodies recovered from jungle or open space, may be attacked by dogs, cats, vultures of jungle-animals and the bodies recovered from water may show gnawing by fish, crabs and other aquatic animals.
Flies, maggots, larvae, etc may alter the wounds.
Sometimes, the criminals for easy disposal and removal may do mutilation or dismemberment of the corpse from the scene of crime.
Injuries may also be inflicted after death merely to mislead investigations.
Artifacts Induced by Improper Autopsy Procedures
The vault of the skull is sawn and then removed gently by inserting and twisting the chisel at various places through the gap generated by sawing.
Any vigorous sawing or using chisel and hammer may result in extension of the existing fractures or fresh fractures may be caused.
In deaths due to compression of the neck, it is preferable to open the skull first.
The draining out of the blood from the neck vessels due to prior removal of skull and brain, provides a clearer view for the study of the neck structures and will avoid occurrence of congestive-artifactual hemorrhages in the neck structures.
When the neck structures are pulled forcefully or improperly, air may enter the vessels of the neck or there may be seepage of blood into the tissues or there may occur fracture of the hyoid bone especially in the elderly.
During removal of the sternum, damage to the heart or internal mammary vessels may lead to seepage of blood in the pleural or pericardial cavities.
While the abdomen or peritoneum is being cut open, coils of intestines may get involved.
Improper pulling apart of the liver may cause tears in the diaphragm and denudation and laceration of the bare area of the liver.
Collection of viscera in a single container or use of contaminated dirty bottles/jars or preservatives may result in wrong conclusions for visceral analysis.
Hear Effects
When the body is exposed to intense heat, the skin becomes tense, leathery, and hard and frequently exhibits splits which may be mistaken for wounds.
Heat fractures may also be encountered. In conflagrations, when the head has been exposed to intense heat, the scalp may show splits and the skullcap may present fissured fractures, which may be mistaken for fractures due to trauma.
‘Heat hematoma’ within the burnt skull can resemble an extradural hemorrhage of antemortem origin.
The frothy brown appearance of the false clot along with heating effects upon the adjacent brain, help in differentiation.
14.23: Psychological Autopsy
Psychological autopsy is a recently developed postmortem investigative tool that aids in the determination of a person’s cause of death.
It is used most often in cases of suspected suicide or homicide. It has a definite role in criminal investigations.
Specific Types of Interviews
Interviews with eyewitnesses: These interviews are usually conducted with persons who witnessed the actual death event and/or persons who found the deceased’s body.
Interview with character witnesses: These are persons who were related to, or acquainted with, the deceased in some or other way, such as family, friends and co-workers
Structured Interview of Reported Symptoms (SIRS) — which can help detect malingering.
Physical autopsy of the corpse: According to psychologists there is a third interview, which involves a physical autopsy of the corpse. Quite often, the dead will reveal hidden secrets about themselves or others of which no witnesses were aware.
Applicability of Psychological Autopsy
Murder investigations — The results can reveal vital information about why the victim was chosen by the killer. This may help to detect similarities between different crimes committed at different times, possibly enabling detectives to pinpoint a criminal’s signature.
Suicide investigations — Psychological autopsies are mostly indicated in cases of suspected suicide. This is sometimes the only way to shed light on the characteristics of suicide victims, and to identify the possible warning signs that may have been present prior to their self-demise.
The procedures of psychological autopsy in suicide cases are aimed at the production of four outcomes:
To establish a method of death.
To determine why the deceased chose to take his or her own life at that specific time and place.
To learn better ways to predict suicidal tendencies and treat people before their behavior reaches harmful levels.
To provide the friends and family of the deceased with explanations for the loss of their loved one, which can serves as a therapy for their suffering and grief.
14.24: Autopsy on a Body of HIV Infection
Identifying and isolating HIV infected bodies is though controversial among the pathologists, there lies no difference of opinion regarding precautions to be taken, while conducting an autopsy on a body suspected to have been infected with HIV.
Conditions and Findings that gives Suspicion of HIV Infection
Clinical History:
Persistent low-grade fever with malaise, and arthralgia of more than one-month duration.
Weight loss, progressive type of greater than 20 percent.
Persistent diarrhea of more than one-month duration.
Persistent gastrointestinal tract infections like:
CMV
Giardia
Cryptosporidia
Isospora
Recurrent vaginitis/cystitis.
Skin rashes non-response to general treatment.
Oral candidiasis, dysphagia, odynophagia.
Jaundice with progressively deteriorating liver function.
Gullian Barrie syndrome.
Rieters syndrome with bell's palsy.
CMV-induced Retinitis.
Intense psoriasis and psoriatic arthritis.
Hansen’s disease is unresponsive to general treatment.
Dead bodies of children of HIV-positive mothers who were breastfed during the probable window period.
Dead bodies whose spouse is suspected to be suffering from HIV infection.
Pulmonary and military tuberculosis nonresponsive to triple-drug regimen.
Systemic herpes zoster infection.
IT purpura.
Recurrent H Ducreyil and treponemal infections
Clinical conditions or findings:
Anorectal diseases.
Gingivitis and seborrheic dermatitis.
Pneumocystis carinii infections.
Hairy leukoplakia over tongue.
Polymyositis
Generalized lymphadenopathy not secondary to Koch’s/ Hodgkin’s.
Hypodensities in white matter
Multiple ring lesions (demonstrated by CT scan)
Cryptococcal/tubercular meningitis.
CSF abnormalities like raised protein/cell count/IgG. • Kaposi sarcoma
Anal squamous cell carcinoma
Non-Melanomatous skin cancers
Additional Precautions
Wearing a head cover and face mask.
Wearing protective goggles.
Wearing a protective disposable gown.
Wearing double gloves for hands.
Wearing thimbles for left-hand fingers.
Incinerating all the protective disposable wears.
Preserving needles and thimbles in 70 percent alcohol for 30 min. before reusing them.
Autoclaving the instruments before reusing them.
Getting the autopsy room washed with household bleach.
Advising the relatives of the deceased to incinerate/cremate the dead body.
If the body is to be buried embalming them with 0.1 percent formalin to reduce the risk during exhumations.